Step 1
Remove the old doorbell button
Step 2
Drill a ⌀17mm hole in the wall (unless you have one already). The center of the hole will be the center of the doorbell button, so please choose the correct placement of the hole accordingly. The correct height is approximately 1.2m above the ground.
Step 3
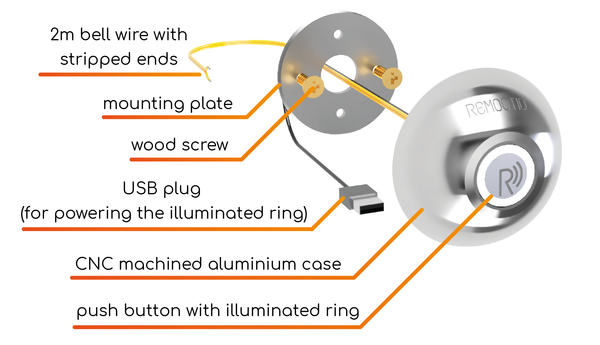
Place the mounting plate over the whole and fix it with 2 or 4 screws.
Step 4
Run the wires through the hole and connect the yellow wires to a system that can receive the signal of the doorbell. (The Remootio doorbel button is a normally open type momentary push switch, which means that the contact between the wires is open when the button is not being pressed and the contact is closed when the button is being pressed. As soon as the button is released, the contact will become open).
Step 5
Screw the doorbell button onto the mounting plate by twisting it right.
If needed you can secure the doorbell button in the correct position using a M2x4mm screw.
Step 6 (optional)
Plug in the USB plug to a USB charger to make the ring around the button light up. Alternatively, you may cut off the USB plug and connect it to another 5V power supply. Make sure that the polarity is correct (red wire is connected to the positive and the black wire is connected to the negative terminal). Also make sure to not connect a voltage higher that 5V to the doorbell button's red and black wires as it may permanently damage it.