If Remootio is wired to the gate or garage door correctly, but it doesn't open or close the gate, there are two things you can try to make it work after checking that the problem isn't caused by a loose connection.
I. Changing the impulse width:
Go to Settings:

Then select "Output Implulse"

There are two sliders, one for each output. Use them to adjust the impulse width. Slide it to the right to increase the duration of the output signal.

II. Output configuration
If you are using both control outputs of Remootio2, you can set them up in different ways depending on what type of gate or garage door you would like to control. Go to settings:

Select "Output Configuration"

Tap on the highlighted button:

Select an option from the scroll menu:

| Output 1 | Output 2 |
| disabled | gate impulse control |
| gate impulse control | free relay output |
| free relay output | gate impulse control |
| output to open | output to close |
| output to close | output to open |
| gate impulse control | gate impulse control |
| gate impulse control | disabled |
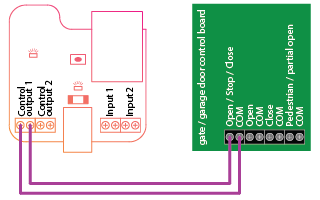
Example wiring diagrams for the different output settings:
- Output 1: disabled
Output 2: gate impulse control

-
Output 1: gate impulse control
Output 2: free relay output

-
Output 1: free relay output
Output 2: gate impulse control

-
Output 1: output to open
Output 2: output to close

-
Output 1: output to close
Output 2: output to open

-
Output 1: gate impulse control
Output 2: gate impulse control

-
Output 1: gate impulse control
Output 2: disabled
After selecting the correct setting hit "Save Changes":

How does the main button change with different output configurations?
If both outputs of the Remootio are used, the main button in the app will be split in two. If one output is used for opening and the other for closing (e.g. "Output 1: output to open | Output 2: output to close"), then the button will be split horizontally as shown in the screenshot below.Tapping on the upper half will activate the output that is associated with opening, and the lower half will activate the one associated with closing.

If one of the outputs is configured as a free relay output (e.g. "Output 1: gate impulse control | Output 2: free relay output"), then the main button will be split horizontally. The left side of the button will trigger the gate control actions, while the right side will trigger the free relay output. This split is shown in the picture below:

III. Latching
The outputs of the Remootio can be activated for a longer period of time, after long pressing the main button. After the long press, the following menu will appear, here the “Hold output active” option has to be selected, and a time interval entered.

A continuous signal given to the input of the gate or garage door opener often overwrites other incoming control signals, thus keeping the gate or door in the current position. This can be useful when you want to overwrite inputs that were sent by the original remotes. The latching can also be useful if you want to overwrite the built-in auto closing feature of your gate opener.
So the latching keeps the output activated continuously, but the different openers may interpret this signal differently. In other words, it is not guaranteed that this will overwrite the auto closing. It is more likely to work with dual input gates.
If the gate or door can't be kept open with the current setting, there might be a solution by reconnecting the control cables and using a different output configuraiton. If only one output is used for controlling the gate, and the gate’s control panel has an input that is only used for opening, then the unused output of the Remootio can be configured as a “free relay” and connected to that terminal. With this, the first input will control the gate normally and the “free relay” output can be used to latch the gate open.