HomeKit garage door opener setup using Remootio 3

HomeKit garage door opener
You can easily make your existing garage door opener work with Apple HomeKit by installing a Remootio 3 unit, which works with most garage door openers.
You can use the following voice commands:
Which Remootio models work with Apple Home?
The following Remootio models are compatible with Apple Home:
- Remootio 3
- Remootio 2
This article focuses on the Remootio 3 but you can also follow along if you have a Remootio 2 unit.
Is Remootio 3 compatible with my existing garage door opener?
Please enter the model number of your garage door opener below to check if it is compatible:
If you are not sure about compatibility of your garage door opener with Remootio 3, please feel free to contact us at support@remootio.com
How to set up Remootio 3 with Apple HomeKit?
You can set up the HomeKit integration by following the steps in the tutorial below:
Step 1, Make sure that your Remootio 3 is installed and set up correctly.
You can visit the Remootio 3 installation guide for reference.
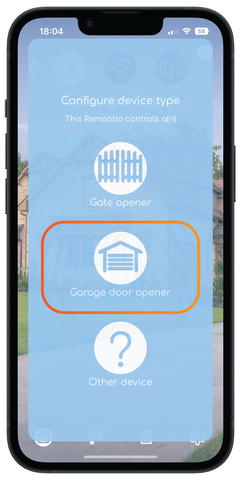
Step 2, Select the type of device (gate or garage door opener)
Please note that Apple HomeKit only works if you select your device is a garage door opener.
Step 3, Go to the settings menu
Tap on the cogwheel icon in the bottom right corner of the main screen.

Step 4, Select HomeKit
Tap on "HomeKit" from the menu.

Step 5, Integrate with HomeKit
Tap on the integrate with "HomeKit" button.

Step 6, Select a home
You can select a home (if you have multiple homes) or just simply select the one you have.

Step 7, Give permission
Allow Remootio to access your Home Data.

Step 8, (optional) Add your first home
If you don't have a Home in the Home app yet, you need to add your home first.

Step 9, Choose a home
Tap on the name of your home that you wish to add Remootio to. If you have multiple homes, they will appear below each other.

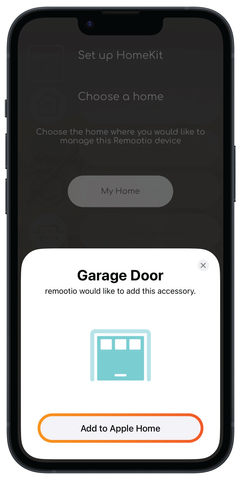
Step 10, Add Garage Door to Apple Home
Tap on the "Add to Apple Home" button to continue.
Step 11, Wait until the setup is in progress
This usually takes a few seconds but may take up to a few minutes.

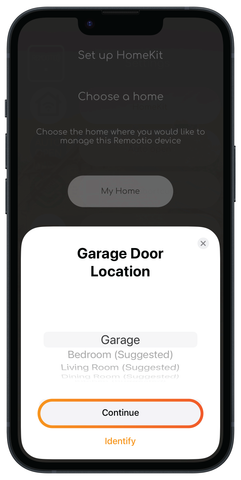
Step 12, Select the location of the garage door
Select "Garage" and then hit "Continue".
Step 13, Name the garage door
You can use the default name or enter a custom name.

Step 14, Setup successful
Congratulations, your garage door has been successfully added to your home. Tap on "Done" to start using your garage door opener through HomeKit.

Step 15, Open Home app
You can open the Home App from the main screen of your iPhone or you can tap on "Open Home app" in the Remootio app.

Step 16, Testing the garage door opener
Make sure that it is safe to operate the garage door (no people / obstacles in the path of the garage door) and tap on the button in the Home App to test if it works as expected.

While the garage door is moving, the text on the button in the Home App will change from "Closed" to "Opening" or from "Open" to "Closing".

Would you like to use your Remootio 3 with CarPlay too? If so, please read our tutorial.
If you have any questions, please feel free to contact us at support@remootio.com